Showing posts with label Single Page Layout. Show all posts

Wednesday, November 13, 2013

Future ~ Scrap Around The World

Hi everyone! I am satisfied with my daughter's remark: so colorful! I know Anis really likes her layout this time. I have never done a colorful layout before so when I take a peek at Scrap Around The World blog for her new mood board challenge, I fell in love with the sketch and the rainbow colors. Here's my creation:  

Supplies: Basic grey patterned paper, Kaisercraft stamp, VersaFine ink pad, Tim Holtz distress marker + ink, Tattered Angel Glimmer Mist, MS border punch, watercolor, 
modeling paste

The beautiful sketch and inspiring rainbow:

...some close-ups pictures...
I live by this sentiment since my school days and now I'm passing it to my children. 
I don't have a stencil so made my own from acetate and crop-a-dile the holes.


Thank you for dropping by. Have a nice day.

Hugs and smiles,

Sunday, July 07, 2013

Relax

Hi everyone! I spent a moment last night doing housekeeping to ensure my laptop lives happily ever after, lol. I was quite panic when suddenly I heard a funny sound while using it. I was so worried if it 'crash'. I didn't think twice and headed to My Pictures to move many folders to separate hard disk and deleted a lot of folders at Picasa because I mainly use this program for editing. Minutes later, the cranky sound stop! Phew! Lesson learnt!

So, while going through folders to move and delete, I came across this layout I haven't blogged yet and would love to share with you. It was done in May during Let's Scrap NSD. This layout is about my youngest child Afza (2+ in 2010) waiting for ice-cream and the long wait made her sulky. 
  Supplies: MS border punch, Kaisercraft stamp and ink pad, Versa Fine ink pad, others from my stash

This "pick your menu" challenge is organized by DT Joyce. She listed out the menu and we pick what we want. I have chosen stuffed mushroom without knowing that is meant for oval shape which is not my cup of tea, lol. I think my handrawn oval isn't so bad after all but not sure if that picture is really oval, lol even though my eldest said it is. 

My main drink is lemonade so because I don't have exciting citrus patterned papers I used citrus card stock and stamp it up. My side dish is baked bean and butternut squash so there are eyelets and flower. My dessert is handwritten journal "oval-ing' the picture and the title Relax someone gave me.

Unfortunately I forgot to add in my entree that is spaghetti with marinara sauce (I forgot twine/thin ribbons...sigh...I just got excited I forgot so I knew instantly I was disqualified, lol. It was a fun challenge indeed and the best part is I have finally scrapped the photo I printed two years ago. Challenges is one good reason to scrap pictures and use up the stash. Do you agree?

Here are some close-ups:


I love her sulky look :) Afza will turn 5 next month, time flies!

I'll be glad if you visit me again tomorrow for Sunshine Mail Foundation Blog Hop which I am their Guest Designer. I also hope you will take part.

Until the morning after...have a nice day.
Hugs and smiles,

Wednesday, March 13, 2013

First Love

My sister asked me three times in a row if I have completed my project for Scrap 365 March sketch challenge. I answered with a "yes I scrap it in my head", hihi. Finally today I lay the imaginary page on Bo Bunny patterned paper. This is my first entrance at Scrap 365. Many times I often visit the site and drool over their sketches hoping to scrap someone but never do. Well not until I snapped this photo of my husband last month and knew this is the time to get messy with paints again and partake in the challenge. Erm, wish me luck =)


The sketch by Kim Woods:
Materials used: Bo Bunny patterned paper, StazOn, Tim Holtz distress ink, Kaisercraft stamp, Tattered Angel template, Carla Craft punch, Martha Stewart punch, water color, Crop-a-Dile, eyelets, dymo tape, die cut and twine

Some close-up pictures:
The quote is by yours truly...that's me {{{smile}}}


In the making process...
 I use a piece of white acid free drawing block for matting and splash it with drops of tea.
 I brush the edges with water to damp it for easy distress. Next I apply StazOn ink pad along the edges, stamp it and sponge up using template. 
My Afza is my scrapping companion but I'm often defocus when she joins me at the table, pfft! 
On that note, I thank you for dropping by. I'll be back soon
Hugs and smiles,

Tuesday, February 26, 2013

You Are My Sweetheart

Hello there! I feel so happy with my end result of today's layout after spending about six hours in the making process at probably three sittings; first stop to make breakfast for my two girls and continue and second stop to take my sweet Anis the girl pictured in this layout to afternoon school and bought blue ribbon and blue thread along the way as this mind kept changing while making this layout. I finished it off at third sitting after I sew the border and quickly make the blue roses; hence why I bought ribbon and thread! 


This layout is designed for the Colorful Creations Press Your Luck Game Board. 

How it works-
Around the game board there are several different challenges, behind each number is a challenge. You will pick a number between 1-20 and whatever challenge that number is behind will be your challenge.

Because I was born on September 9 and often consider 9 as my lucky number {chuckle} so I have chosen number 9 and the challenge is to follow the sketch below. I twist the sketch a little by placing the photo on the right side:

Materials used: Prima Marketing (Romantique Collection "Crumpet" patterned paper/Say It In Crystals bling/blooms), Cosmo Cricket Tiny Type alpha stickers, Kaisercraft (ink pad/wooden flourishes/clear stamp "English Rose"), Staz-On ink pad, Martha Stewart acrylic paint, others from my stash
 
...some close-up pictures...
I love working on the title...
...and stamping on these acid free drawing papers. I painted the butterfly and randomly stamp it up with brown ink pad. I especially adore the handmade blue roses...did them during phone conversation with my sister :)

It's raining (again...guess the rainy season has set in; fortunately we had enough sunshine this morning to dry my mountain high laundry, phew). Time to say bye for now so I can clean the mess on my dining table and set the table for dinner in a short while; meaning to say before my hubby gets home from work, hihi.
Thank you for visiting me today. I feel so happy and always in cloud nine every time I get visitors. I'll be back soon. 
Hugs and smiles,

Tuesday, February 19, 2013

My Blessings Happy Faces

Hi everyone! Today's make is a layout based on a sketch from Let's Get Shabby for its Challenge #42 and Design Team Call that attempted me to give it a go. I have been meaning to scrap my four blessings for ages but all I did with their photo so far was down size the picture to smaller pixel so it fits into the photo cube generator as seen on the right side bar...my children love to see themselves rolling 360 degrees. lol.  
Eventually here's my take: 

Materials used: Bo Bunny patterned paper, Tim Holtz distress ink, Martha Stewart punch/acrylic craft paint, Smooch, Kaisercraft stamp/wooden flourishes/ink pad/rub on, Prima flowers/bling, crochet flowers by Lili Sulastri and others from my stash

The sketch:
Isn't that a pretty shabby sketch!
...and here's some close-ups...
I used acrylic paint for the alpha first layer and touch up with water color, a bit of smooch and sponge up the egde.
My credit and sincere thank you to my sister Lili Sulastri for the crochet flowers. She's so good at it.
Eyelets and lacing are some of my favorite things.
I did the rub on at nearly mid-night and it's either the lighting was to dim or my eyes were sleepy thus the slip off of some letters...duh...but hey, that's art...hihi.
Can't do without personal note for my children. They are the reason I breath and scrap =D

Until the morning after. I always appreciate your visit and I will do my best to leave you some love whenever I get the chance to visit you. Keep smiling and may happiness be yours all the time.
Hugs and smiles,

Sunday, October 14, 2012

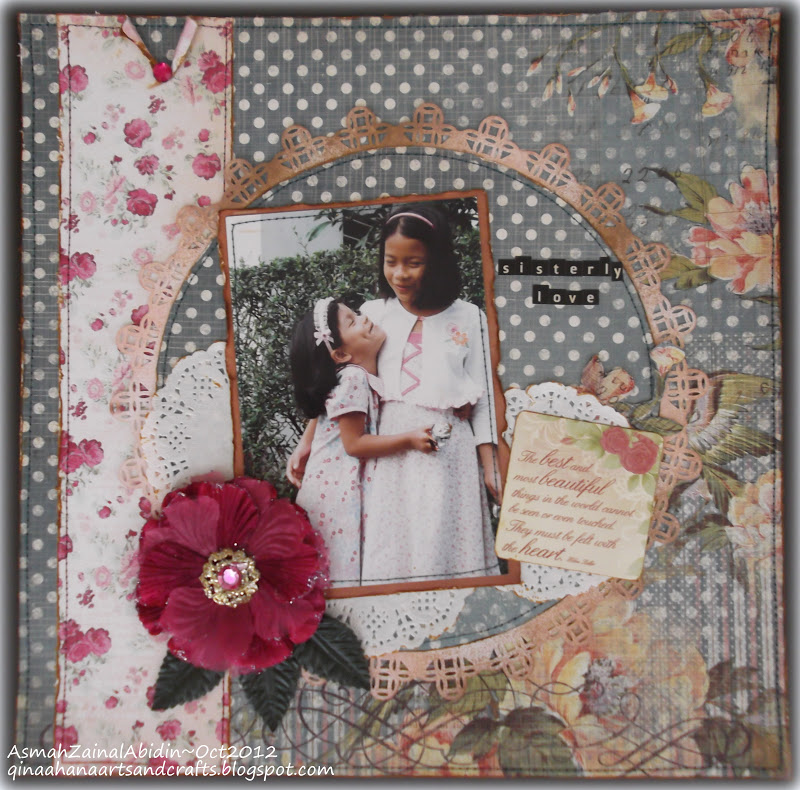
Sisterly Love

Two and a half hours taken to create this layout for Colorful Creations before deadline; thought I couldn't make it yet I made it...relief! I have always wanted to scrap this lovely photo of my two girls which had been in a hidden storage for I don't know how long but all I can remember is I took this photo of them in my parents' backyard while they went to the bank...the year was 2007. While waiting, we spent some time in the backyard and as always the girls (especially Anis the joker) were teasing and making fun of each other so this photo is a candid shot indeed. 
  
 Materials used: Kaisercraft Sweet Nothings Collection and sentiment, Prima flower, Tim Holtz distress ink pad, MS punch, Tattered Angel Glimmer Mist, Cosmo Cricket Tiny Type alphas, my trusty sewing machine,doilies and leaves from my stash
 
Heres's the sketch I enjoyed working with:
 ...some close-up photos...


At times I ask myself when I scrap a photo like this and keep the layout in the album, I wonder who between the two will eventually keep this layout forever?  
 
Have a nice day and thank you for visiting.
Hugs and smiles,


Sunday, September 16, 2012

Our Lives are like Storybooks...and Doily Flowers Tutorial

One of the tasks as a Design Team Member for Let's Scrap is to make at least one tutorial which appears every fortnight. Once again it's my turn this week to create something I have never done before that is flowers from doilies. I like to create things with materials that can be found easily around the house or from waste not want not useful items. I was on my way to the kitchen when I saw some doilies sitting in the paper tray and the creative button in my brain suddenly function! That's it; I was going to make flowers and quickly grab the doilies and work on it.
 
Here's my example layout to showcase the doily flower:
 
This layout used the left side of this sketch:
 
Materials used: So Sophie cardstock, Tim Holtz distress ink, Kaisercraft stamps and ink, Memory ink pad, Ginger's House digi sentiment, Tattered Angel glimmer mist, MS punch, Petaloo flower charm, acid free drawing block, doilies and others from my stash
 
...some close-ups...
I find the quote interesting and used it for the title
 
My only son Muhammad 'Arif and second daughter Nur Anis Farhana
 
 
Let's Scrap Administrator Debby told me it looks like store bought. What do you think? 

Next is my example 3D card where I've adhered the doily flower:
 
This card is made based on this sketch:
 
Materials used: Copic, Tim Holtz distress ink, Ginger's House digi quote, Pattern Pack Spring Morning papers, others from my stash


3D card flatten and ready for mailing
  
Doily Flowers Tutorial
 
Step 4 and 5: Trim about 1cm along all the folded edges to ruffle them up later.
 
Step 11 is optional. Either you mist with glimmer mist or you can distress it with distress ink or up to your imagination. You can adorn the center with anything you desire. I applied digi image and flower charms from Petaloo in the center.
 
You won't read any further because I'm stopping here...sorry for the lengthy post =) I hope my layout and card gives you some inspirations and find my tutorial useful. I would love so much to see your doily flowers in your creations {give me your creation link if you do! Thanks}.
 
As always, it's a delight to have your visit today and thank you for leaving me comment and do visit again for another tutorial coming soon.
...Hugs and smiles...