Showing posts with label Off The Page. Show all posts

Monday, July 27, 2015

Wood Decor @ STAMPlorations

{My DT work for STAMPlorations}


Hi there! I'm thrill to show you my first home decor designed in mixed media style using Weathered Wood stencil. First let me say that I love nature and besides my love for bricks, wood grain is my second love! Or should I say I love rustic look in my house.

I wanted to make this extra special by adding yellow roses because I wanted to give this to my Mother for her birthday last July 17 who loves roses. She was delighted to receive it and ordered me to hang it on the wall at her porch and made me feel proud {chuckle}
Supplies used: Weathered Wood ARTplorations Stencil, Alpha gesso & modeling paste, watercolor paints, scallop die from my Ausralian friend and from my stash: yellow roses, micro beads, lace and gauze 
I used watercolor paints to bring in the realistic touch on the wood grain paste and sprayed brown mists to get the look. I did it several times to achieve what I wanted and feel satisfied with the end result.
So this was the original piece of wood I bought some three years ago and keep hoard it in the dark drawer until I gave it life to my heart content {smile}. That is just a piece of paper with pretty flowers adhered on the wood. I didn't want the picture but the wood {lol} so I altered a bit and created my own summer touch with blossoming flowers.

Take a look at STAMPlorations blog to see two other fabulous creations by my teammates. I hope you will like our projects and inspired to create mixed media in your creations.

I would like to take my project into these challenges:
1. The Mixed Media Challenge Blog : Summer Days
2. Mixed Media Place : Exercise #10 One Important Word
3. Berry71bleu : Use Die

Until I see you in a moment of time with my next project:~ a mixed media art journal step by step tutorial.

Have a good day.

Hugs and smiles,

Sunday, July 05, 2015

Nothing Is Impossible @ Stamplorations {Stencil Sunday & July Mixed Media Challenge}

{My DT work for Stamplorations}

Hello everyone! I am so excited to share my story for today. 
On this beautiful Sunday, me and six teammates from Stamplorations Mixed Media Design Team is officially presenting our first creations to inspire you.
We bring you our first Mixed Media Challenge every Sunday. 
Hop over to Stamplorations blog and have a see at what the design team created. 
You can make anything your heart desire but no cards please. 

I altered an old ping pong bat into a home decoration for wall hanging. My eldest daughter is a sports fanatic and school athlete since primary school until she attends secondary school yet her love for sports never fade. She knew I was up to something when I asked if she still needed her old worn out ping pong bat that she hardly use ever since she bought new ones with my money {smile}
Supplies: Stamplorations Gridlocked Stencil, sentiment from Lisa, Webster's butterflies, Tattered Angel Glimmer Mist, Buncho watercolors, Copic Sketch, Micia brown ink pad, Tim Holtz distress pen, Alpha gesso and modeling paste, tissue serviette, PVA glue, flowers from haberdashery, brown string, buttons and beads from my stash

I used gridlocked stencil to make a brick wall on the bat so I can decorate it with flowers in a way to create a garden scene. Like the stencil I used? Click here for info.
Some close-up photos:
When crafting sometimes I get brain stuck. I wasn't sure whether I I should wrap up the entire handle or stop right in the middle so I asked for my little girl's opinion. She said I should stop in the middle. Yup, I listened to my 7yo child {kids often knows better, smile}.
So I thought of sharing how the ping pong bat looks like before alteration.
Left picture is the front side. I peeled off the first layer and sponge underneath until I get nice rough texture of purposely uncleaned surface. Then I gave two coats of gesso, placed tissue serviete and gesso(ed) again.
Right picture is the back side; rid off the black and sponge layers and smooth the wood surface with sandpaper. 

My eldest daughter will be home next Tuesday; she lives in boarding school by the way. Well you bet I can hardly wait to show her what I did. I'm already thinking what else she owns and not using no more {lol}. You know, just to keep myself busy :-)
 I hope you find my project inspiring or should I say one's thrash is another person's treasure.
With that note, I wish you good luck in your mixed media project and show us your creativity. Remember, 31 July is final day to link up your project at Stamplorations.

Hugs and smiles,

Sunday, February 08, 2015

Dreams {Finnabair: Sparkle & Shine}

Hi everyone! I am not feeling good these days probably due to the extreme hot and humid climate since the arising of the New Year. That however doesn't stop me from creating. I took a moment to make this canvas work I've been meaning to work on for so long. When I saw Finnabair: Sparkle & Shine blog hop and challenge a couple of weeks ago, I thought this would be an opportunity to step out of my comfort zone because I am not really a sparkle and shine kind of person. Believe me, I don't even wear my gold and diamond wedding ring!

 I set to work yesterday evening and considering this is my first canvas work for my sister's birthday present, I hoped all goes smoothly because time was running. I had intended to make a layout but changed my mind because I would like her to place it on her desk at work because she spends all day long there and only comes home to sleep {chuckle}.
Supplies: canvas, acrylic gesso, acrylic modeling paste, gauze, lace, handmade flowers, seed beads, flower charms, rhinestones, faux pearls, Tattered Angel Glimmer Mist, Tim Holtz distress ink, Brilliance ink pad, Carla Craft leaf punch, water color, gold paint,  

  As the process took off step by step, I wasn't sure what I was doing! I do not have many of the products the dt ladies used {I mainly used some of the things in my stash}. I swear I visited their blog many times to oohhh-ing and aahhh-ing their stunning work to get some inspirations. 

The creations by Finnnabair's design team are so gorgeous and very inspiring:
 Some up close photos:
That is my sister Lili in her early 20's during a cultural show at Universiti Malaya where she studied geology yet active in the culture society in campus. She had no idea I stole and crop her photo that being kept in a dark box for years. I figured it would be more appropriate to display her charming smile on a canvas so she can look at it while working and reminisce the old times once in a while {smile} without distracting her too much from working that is {hihi}. I decided to leave the white space around the photo to let the eyes rest and admire the 'dancer' for a while {lol}. Well, I really hope she will like it!

Thank you for dropping by. I am so glad to have your visit and until then, may all your dreams come true.

Hugs and smiles,

Monday, April 28, 2014

Flora and Fauna in Frame ~ Scrapkopilka

Hi there! I'm back again with another craft project and this is a re-purpose made, something that I have saved for some years in  the waste not want not bin. They are mostly my treasure and too hard to be part with for sentimental value reason I think {smile}

For this project, I altered a frame that was once a lamp on my living room wall. Back in August 2011, my children and I painted the walls and I took down the lamp. It's been there for some five years ever since we moved into this cottage (erm, it's just an ordinary house but I love to call it as cottage because of my love for the wonderful cottages in England). Unfortunately I noticed some crack so I thought it's best to replace with a new one. Luckily we had bought two same lamps but kept the other in a box since other walls are fixed with different lamp designs.

So this is what I came out with:
Supplies: patterned papers (Making Memories, Tim Holtz Idea-logy), Tim Holtz distress ink, Kaisercraft stamps & wooden flourish, butterflies from sticker sheet backing, buttons, lace and blooms  

Previously I took part in Scrapkopilka Joint Venture "Spring Planner" Stage 1 and this is Stage 2: Make a frame / garland / pillow + MA - cloth / tape. 
I remember the frame so decided to decorate it with spring in mind.
...Before and After...
The actual frame of the lamp was in dark brown...
 then I spray painted with white at my lawn and leave it under the sun to dry.
 Once dried, I measured a super thick cardboard to fill in the empty frame. Thank you Lili {my sister} for the cardboard. I really like its durability yet it took me a while to chop it off with cutting knife because of its thickness...left me some sweat! I used PVA glue to adhere the two together and leave it to dry.
 Tada...and its ready for decoration...how fun is that! 
 Some blooms are store bought, some are from Lili, some are from my children's broken hair ornaments so I figured I gather them all in one place and create a garden scene. I find the blooms are very colorful so decided to leave the lamp post as it is for natural balance. I think this frame of flora and fauna will look nice in my mother's living room {{{love you Mom}}}. 
I am very pleased with the end result and so looking forward to make another project for Stage 3. Hop on to Scrapkopilka for more great challenges. 

I would also like to partake in these challenges:
1. A Random Fan : Anything Goes (1/5)
2. Craft My Life : Anything But A Card (2nd entry)
3. Bunny Zoe's Crafts : Distress
4. Crafting From The Heart : Always Anything Goes
5. Craft Your Passion : Up In The Air / Things That Can Fly
6. Created With Love : In The Garden (1/3)
7. Just b Creative Crazy : April's Just Because Linky Party (3rd entry)
8. Little Scrap Pieces : Show It Off Saturday Linky Party
9. My Sheri Crafts : In Celebration of Moms
10. Jo's Scrap Shack : Fun-Day Friday Challenge "I Love You Mom"
11. Brown Sugar Challenge : Anything Goes
12. Creative Moments : Anything Goes / Spring
13. Challenges 4 Everybody : Anything Goes (2/3)
14. Crafty Calendar : Things With Wings

Thanks so much for dropping by. I value your visit and come back soon.

Hugs and smiles.

Thursday, April 24, 2014

Guest Designer and Cantilever Box

Hi there! I am happy to be given the honor by Creative Knockouts a Guest Designer spot this week for their Anything Goes challenge. {{{Thank You}}}

DigiStamps4Joy is happily sponsoring the challenge at the Creative Knockouts running from 24-30 April 2014. 

This is my creation Cantilever Boxes for some inspirations and they are made with unconditional love for my two elder girls. This will be their lovely keepsake I'm sure. Already Anis is loving her red box while 'Alyaa will get to see hers when she comes home next Thursday. 
Supplies: patterned papers (Basic Grey, Moxxi and Foof-A-La), golden brads (from Taiwan), colorful brads (Basic Grey), distress ink pad (Tim Holtz and Memory) and cardstocks

Thursday, April 17, 2014

My Father's Legacy

It's blue skies and everything nice today and that takes me to recycling mood these days. When it comes to recycling, the most important person who instilled recycle+reuse+reduce+respect values in me is none other than my Father. He treasured everything he owned and organized them neatly in his workshop. Okay, he had a workshop he built himself. I wish I could do that myself so I too can have my own work space like Dad and be more organized in one area {sigh}.  
 Today's story is about my Father's glucose tin and that's the very last one he owned several weeks before he met his creator three years ago.
This is what I came out with...a decorated glucose tin filled up with some markers and toppers.
Unlike Dad who kept his bolts and nuts in his glucose tins with the lid intact and no decoration of course, I put in my markers {smile}. I think later I will put in flowers because I wish to give this creation to my Mother.
I am inspired to make this creation after I found SkrapKopilka while browsing my dashboard. I am especially in love with their Joint Venture "Spring Planner" challenge.
 There are four stages altogether and this is the first stage I am doing. Creation for Stage 1 must have  topper / magnet / tablet-pointer + MA - Button / Brads/Clothespin.  
I am so glad to have found this blog because it gives me the chance to dig out my huge tier drawers where I keep all kinds of things only God knows what's in there to craft! Mind you, that simply explain 'hoarding'! 
Apparently, when my Mother gave me the glucose while I was packing luggage to return back to my house in 2012, she told me to finish it off! It broke my heart. For once the tin doesn't carry Dad's handwriting. He's the person who would write down the day and date on the stuff he bought. I knew he didn't buy it himself but someone did for him. Weeks before Dad's passing, he was bed-ridden and drank special formula milk through a tube. He didn't take the glucose anymore. I brought it back anyway and it was hard for me to even take a spoon to scoop. Fortunately my son offered to take it a scoop at a time whenever he made milo. He didn't take long to finish it. I washed the tin and later keep it in the tier drawer aiming to decorate it some day! The dates underneath the tin will always...always remind me of the sad episodes prior to Dad's passing and the memories he left behind. 
In the next few days, I will be somewhat busy with my sewing machine most probably because I can hardly wait to finish off unfinished projects for Stage 2. Head over to ScrapKopilka for more awesome challenges.

I would also like to partake in these challenges:
1. A Creative Need : Signs of Sping (2/3)
2. Bloggers : Alter It
3. Creative Fingers : Anything Goes with Crafty Sentiments
4. Polkadoodle : Spring Time (1/2)

I value your visit and I shall do my best to visit you some day. Until the morning after. Take care and have a nice day.


Hugs and smiles,

Wednesday, November 06, 2013

English Rose Mini Dresser + Tutorial {DS4J Mid-Challenge Reminder}

Hello my lovely friends! I'm back again to remind you of DigiStamps4Joy mid-challenge.
This challenge is hosted by the talented Charlene. She challenge the design team and all of you to use three designed papers and three layers. Take a peek at DS4J blog for some inspirations from the design team B.

I have created a lovely keepsake for my little girl who will start pre-school in January 2014. This mini-dresser takes a while to make and lots of patience. I have used a digi image from DS4J entitle See-through Lady. Please click here to purchase her.
 Supplies: DS4J digi image, Kaisercraft English Rose Collection patterned papers/sentiment/brown ink pad, Copic Sketch, cardstocks, cereal boxes
I thank Andrea&Clarissa for their wonderful tutorial. I did a bit of twist according to my preference by adding cut outs from cereal boxes for stability to prolong the life of the drawers and the entire dresser. I have also adjusted the measurement to fit the drawers as I realized that  the case of drawers needed extra centimeters for easy release. Thus I decided to make my own version of tutorial so it gives you some ideas how I did it.
HERE's MY HOW-TO
1.  Six pieces of cardstock size 21x20cm for six drawers. Measure and score according to the picture above.
2. Cut according to this diagram and fold.  
3. I have adhered strips of heavy duty cards from cereal box. 
4. On the backside, I adorned the front of the drawer with patterned paper and sewn the bead button; you may also use a brad.
5. I adhered another piece of cereal card box and applied patterned paper in the drawer. This is optional though.
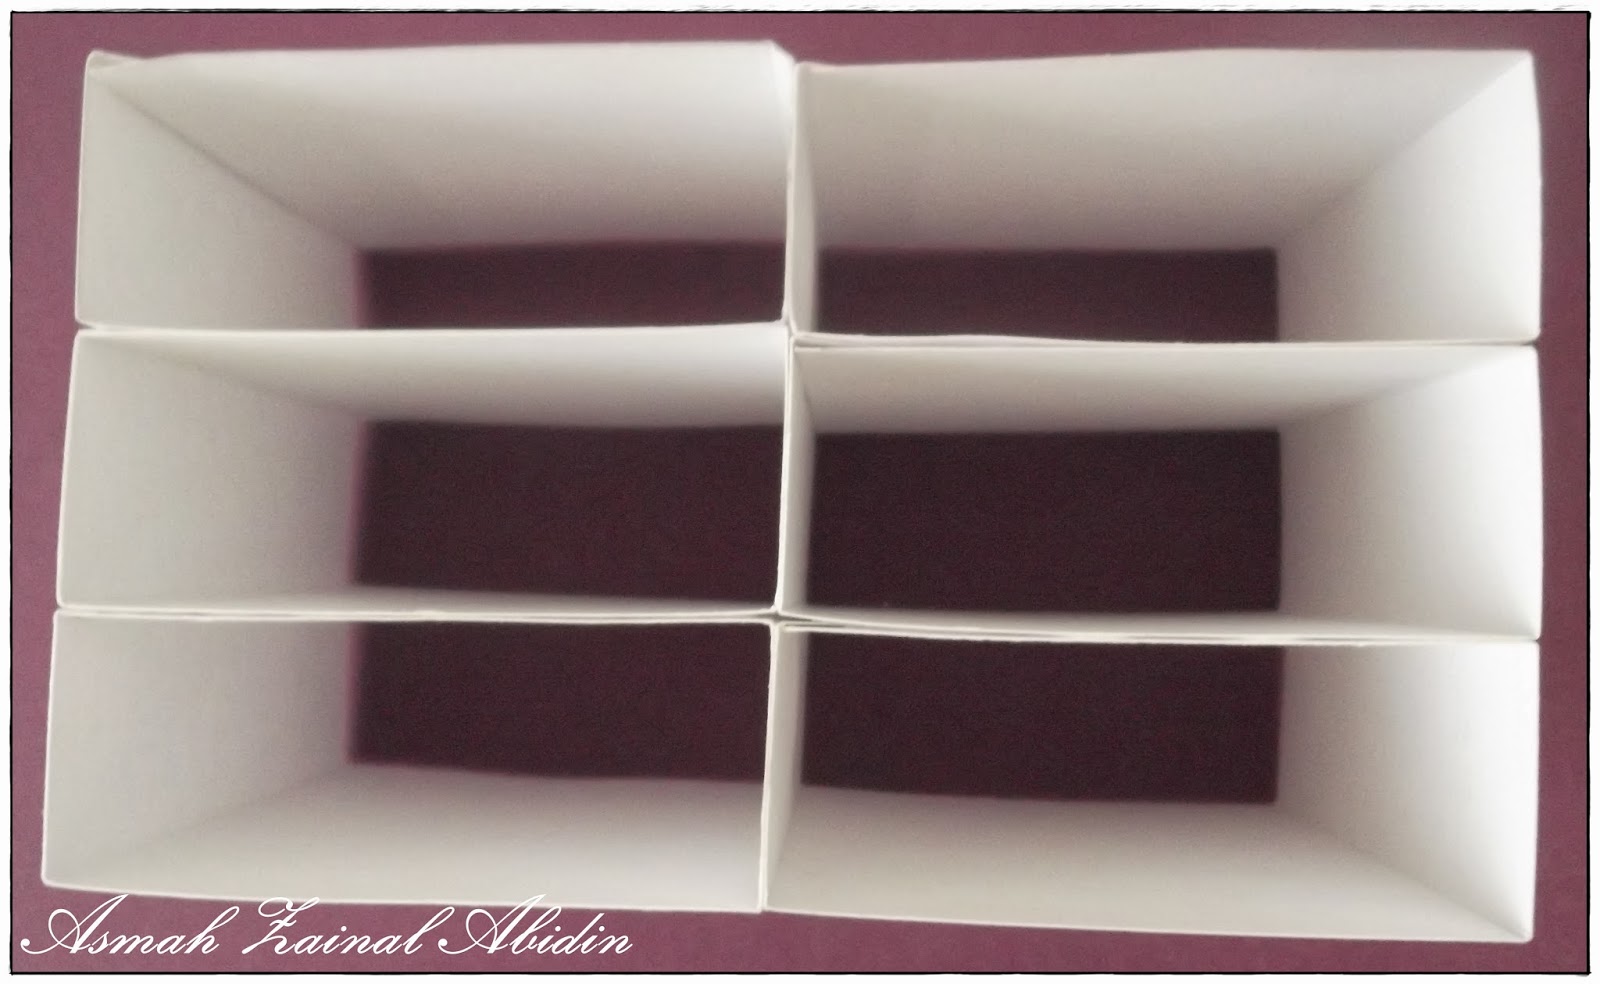
7. This is the tricky part where you must be sure to place the drawer on this cardstock for accuracy even though the measurement is given. Be sure you can easily slot the drawer in and out. Please take note that my measurement may not work for you; it really depends on the drawers you have made and you may need to adjust your own measurement to fit in your drawers even though they look all the same. 
8. Adhere two cases together.
9. I have used glue on top of the cases to stack all six cases.
10. This is how it looks like after stacking them all up.
11. This is how I measure the backside for the mini dresser. 
12. Cut off the four corners and adhered a piece of cereal box card. {Sorry the picture is somewhat misty; must be the rainy day that cause my poor photography, we are having monsoon season right now}
13. This is how the backside looks like...
 14. And from the front side...

 15. Here's my measurement for its top surface. {Sorry another blurry image; so anyway, that is 11cm [W] and 33cm [L]. Score at 9.7cm, 26cm and leave about 2cm to fold the edge like picture below}.
 16. Place the mini dresser on the cardstock and adhere. Take note that I have adhered a piece of cereal box card for longevity :)
 17. This is for the front view. You can do exactly like mine or decorate the top edge to your heart content. I did adhere cereal box cards before I applied patterned papers.
18. Tada...your mini dresser is ready for embellishment. I hope you find my step by step tutorial helpful. Feel free to question me in your comment if you have any doubts or email me if you like. I'm willing to answer your curiosity :-)

 Take note that I adhered cereal box cards underneath the patterned papers on all sides. I have also made a platform from cereal box to place the mini dresser.
I enjoyed making this English Rose Mini Dresser and will make three more when I'm free. That is because my other three children want similar keepsake too. Plus my big sister and her girl are demanding the same...giggle. By the way, the name English Rose comes from the patterned paper collection by Kaisercraft. It's one of my earliest collection, a gift from my sister to push me into scrapbooking, lol.

I would to take this keepsake into these challenges:
1. Craft My Life : Non Card creations
2. Card Mania : Anything Goes
3. Craftin Desert Divas : Anything Goes
4. Craft Your Passion : More Than 1 Fold (1/3)
5. Digi Make Over : Lots of Layers
6. Kaboodle Doodles : Tribute To A Loved One
7. Lunagirl Moonbeams : Secret & Hidden Things
8. Make It Monday : Anything Goes
9. My Craft Creations : Anything Goes (1st entry)
10. Stamp and Create : Feathers or Leaves

Until the morning after. Have a nice day.
Hugs and smiles,